Pellet-Grill Red Wine–Braised Short Ribs

There’s a point in every braise where you stop cooking dinner and start cooking a mood. This is that recipe. It takes most of an afternoon, it uses almost every burner and rack I own, and by the time it’s done my whole house smells like a steakhouse that got into an argument with a wine cellar. I wouldn’t have it any other way.

I started making short ribs the usual way, braised low and slow in the oven, and they were good. Then I got stubborn about it and decided the pellet grill should get a turn before the Dutch oven does. A short smoke before the braise adds a layer of flavor you can’t get from an oven no matter how patient you are, and it turns out beef short ribs and red wine were basically made to sit next to a little oak smoke. This version is richer, smokier, and more fall-apart tender than anything I made before I started doing it this way.

Give yourself the afternoon. It’s mostly waiting, and it’s worth every minute.
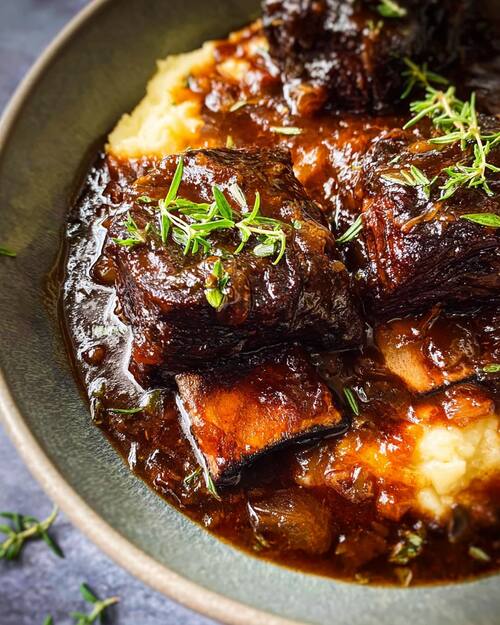
Plated pellet-grill red wine braised short ribs

Rich, smoky and fall-apart tender. Serves 4–6.

Ingredients

  • 4–5 pounds bone-in English-cut beef short ribs
  • 2½ teaspoons kosher salt
  • 1 teaspoon coarse black pepper
  • 2 tablespoons neutral cooking oil
  • 1 large yellow onion, diced
  • 2 large carrots, diced
  • 2 celery ribs, diced
  • 5 garlic cloves, minced
  • 2 tablespoons tomato paste
  • 2 cups dry red wine, preferably Cabernet Sauvignon
  • 2 cups low-sodium beef stock
  • 1 tablespoon Worcestershire sauce
  • 2 sprigs fresh rosemary
  • 5 sprigs fresh thyme
  • 2 bay leaves
  • 1 tablespoon cold butter
  • Chopped fresh parsley for serving, optional

Recommended Pellets

Oak provides the best foundation for the beef and red wine. Oak mixed with pecan adds a slightly richer, sweeter smoke. Hickory also works, but use it lightly so it doesn’t overpower the sauce.

Instructions

1. Season the short ribs

Pat the short ribs completely dry. Season them on every side with the kosher salt and black pepper.

For deeper seasoning, refrigerate the ribs uncovered for 4 hours or overnight. Let them sit at room temperature for about 30 minutes before cooking.

2. Smoke the ribs

Preheat the pellet grill to 250°F.

Place the ribs directly on the grill grates, leaving space between them. Smoke for 45–60 minutes, turning once halfway through. You aren’t trying to cook them through – you’re developing a smoky exterior.

Remove the ribs and increase the pellet grill temperature to 275°F.

3. Brown the ribs

Place the cast-iron Dutch oven over medium-high heat on the stovetop or directly over a suitable side burner.

Add the cooking oil. Working in batches, brown the smoked ribs for approximately 2–3 minutes per side. Transfer them to a plate.

The initial smoking develops flavor; the browning builds the deep, roasted foundation for the sauce.

4. Build the braising liquid

Reduce the heat to medium. Add the onion, carrots and celery to the Dutch oven. Cook for 8–10 minutes, stirring occasionally, until softened and beginning to caramelize.

Add the garlic and cook for 30 seconds.

Stir in the tomato paste and cook for 2–3 minutes, until it darkens to a rusty brick-red color.

Pour in the red wine. Bring it to a strong simmer, scraping up all the browned bits from the bottom of the pot. Simmer for 8–10 minutes, or until the wine has reduced by approximately half.

Add the beef stock and Worcestershire sauce. Stir well.

5. Braise the ribs

Return the short ribs to the Dutch oven, placing them bone-side up. The liquid should reach approximately two-thirds of the way up the meat. Add a little additional beef stock if necessary, but don’t completely submerge the ribs.

Tuck the rosemary, thyme and bay leaves into the liquid.

Place the Dutch oven on the pellet grill uncovered and cook at 275°F for 30 minutes, allowing the sauce and meat to pick up a little more smoke.

Cover the Dutch oven tightly and continue braising at 275°F for 3–3½ hours. Turn the ribs once after about 2 hours.

Begin checking them at the three-hour mark. They’re ready when the meat is around 200–210°F and a thermometer probe or fork slides in with almost no resistance. Tenderness is more important than the exact temperature.

If they still feel firm, cover the pot and continue cooking, checking every 20–30 minutes.

6. Rest the ribs

Carefully transfer the ribs to a platter and loosely cover them with foil. Let them rest for 20–30 minutes.

Remove and discard the rosemary stems, thyme stems and bay leaves. Skim as much fat as possible from the surface of the braising liquid.

7. Finish the sauce

For a rustic sauce, leave the vegetables in the pot.

For a smooth, restaurant-style sauce, pour the liquid through a fine-mesh strainer, pressing gently on the vegetables to extract their juices. Discard the vegetables and return the liquid to the Dutch oven.

Place the Dutch oven over medium heat and simmer the sauce uncovered for 10–20 minutes, until concentrated and thick enough to lightly coat the back of a spoon.

Remove it from the heat and whisk in the cold butter. Taste and adjust with salt and pepper.

Return the ribs to the finished sauce and spoon it generously over the meat.

Serving

Serve the ribs over buttery mashed potatoes, creamy Parmesan polenta or risotto. Spoon plenty of the red-wine sauce over everything and finish with chopped parsley if desired.

Make-Ahead Method

These short ribs are even better the next day.

Allow the ribs to cool in their braising liquid, then refrigerate overnight. The fat will solidify on the surface and can be easily removed.

Reheat the ribs, covered, on the pellet grill or in the oven at 300°F for 35–45 minutes. Remove the ribs, reduce the sauce if necessary and finish it with cold butter.

Cast-Iron Note

An enameled cast-iron Dutch oven is ideal. Red wine and tomato paste are acidic, so a long braise can weaken the seasoning on bare cast iron and occasionally give the sauce a metallic taste. If your Dutch oven is bare cast iron, make sure it is extremely well seasoned and don’t leave the finished sauce sitting in it overnight. Transfer the ribs and sauce to a nonreactive container before refrigerating.


If you make these, I want to hear about it. And if your sauce comes out thin, greasy, or won’t reduce no matter how long you simmer it, that’s a Kitchen Forensics post waiting to happen. Let me know.

Twenty-Five Years On: A Tribute to What We Lost, and What We Carry

Every year, September 11th arrives the same way, quietly, on a calendar square that looks like any other, until it doesn’t. The date carries its own weight now, independent of whatever else is happening in the world or in our own lives. For a few hours, it pulls millions of people back to the same morning, a blue sky, a first plane, a second, and then the slow, disbelieving realization that the day had changed shape.

Nearly 3,000 people did not come home that day. They were office workers who had already poured their first coffee. Firefighters and police officers who ran toward the towers while everyone else ran away. Passengers on four flights who, in the space of an hour, went from strangers to the last line of defense against an unknown target, and in the case of Flight 93, chose to act, and gave up their own lives so that others might live. They were parents, children, neighbors, people in the middle of ordinary Tuesdays. None of them woke up that morning expecting it to be their last.

It’s worth pausing on that plainly, without rushing past it. An entire day’s worth of ordinary plans, meetings, errands, phone calls home, was simply erased. The scale of it is almost impossible to hold in the mind all at once, which is probably why we return to it every year in pieces, a name read aloud, a photograph, a single story, rather than trying to take in the whole unbearable sum at once.

What’s often remembered alongside the loss is what came right after it. Not the politics or the decades of consequence that followed, just the hours in the wreckage. Firefighters who went back in after the first collapse. Ironworkers and construction crews who showed up at Ground Zero without being asked and stayed for months. Strangers carrying other strangers down dozens of flights of stairs. Blood banks that had to turn donors away because so many people showed up to give. None of it undid the loss, but it said something true about what people are capable of when it matters most, and it’s part of why the day still gets remembered with a kind of stubborn respect, not just grief.

There’s also a slower toll that gets less attention, the first responders and survivors who’ve died in the years since from illnesses tied to the toxic dust and debris at the site. Their names are still being added to memorials. Their families are still grieving losses that trace back to that morning, even when those losses came fifteen or twenty years later. Remembering September 11th honestly means holding that too, the day didn’t really end when the fires finally went out.

An anniversary like this one asks something specific of us, not to relive the horror on repeat, but to keep faith with the people who were lost by refusing to let them turn into an abstraction. A number. A backdrop for other arguments. Each of the nearly 3,000 had a name, a voice, people who loved them and still do. The Pentagon memorial, the Flight 93 National Memorial out in the fields near Shanksville, and the reflecting pools where the towers once stood all exist for the same reason, so grief has somewhere to stand, and so visitors, years and decades removed from the event itself, still have to reckon with the human scale of what happened, one name at a time.

It’s been a long time now. Whole generations have grown up who only know that morning as history, something told to them rather than something they lived through. That’s part of what a tribute is for too, not just comforting the people who remember, but making sure the people who weren’t there still understand what was lost, and why it mattered.

So today, however it lands for you, as a memory, a history lesson, or something you’re only now really sitting with, it’s worth taking a moment. For the people who never made it home. For the ones who ran in. For the families who have spent every September 11th since rebuilding a life around an absence. They’re owed at least that much, to be remembered not as a statistic or a symbol, but as who they actually were.

We didn’t know them all. But we don’t have to have known someone to owe them that much.

Why Is My Chicken Rubbery?

Last time, in Why Is My Chicken Always Dry?, we talked about chicken that turns to sawdust on the plate. I promised we’d come back for the other complaint I hear just as often: “It’s not dry, exactly… it’s just rubbery.” Bouncy. A little gummy. The kind of bite that makes you wonder if you’re eating chicken or a chew toy.

Good news: this is a completely different failure mode from dry chicken, which means it has a completely different fix. Let’s get into it.

Dry vs. Rubbery: Not the Same Crime

Dry chicken is a moisture problem — the proteins tightened up and wrung the water out, like squeezing a sponge. Rubbery chicken is a texture problem. The moisture might still be in there; the muscle fibers themselves have just gone stiff and tight, so every bite fights back. Same suspect (heat, mostly), different crime scene.

The Usual Suspects

1. You cooked it too long – even at a “safe” temperature. This is the big one, and it trips people up because it feels counterintuitive. Chicken doesn’t just dry out with extra time on the heat; the muscle fibers keep contracting and squeezing tighter the longer they’re exposed, even if the internal temp isn’t climbing much anymore. That’s what turns tender protein into something you have to work at. The fix is the same one I harped on in the dry chicken post: pull it at temperature, not on a timer. 165°F for breasts, then stop – don’t give it “a few extra minutes just to be safe.”

2. Poaching, boiling, or steaming at too high a heat. Wet cooking methods are notorious for rubbery chicken because it’s easy to let the liquid roar at a boil instead of a gentle simmer. A hard boil agitates and toughens the protein fast. If you’re poaching chicken for salads or soup, keep the liquid at a bare simmer – small bubbles, not a rolling boil – and pull the chicken the moment it hits temperature.

3. Marinated too long in something acidic. Acid (citrus, vinegar, yogurt, wine) is great for flavor and can tenderize in small doses, but leave chicken in a strongly acidic marinade too long and it does the opposite: it denatures the surface proteins so aggressively that they turn tight and mealy, almost like it’s been “cooked” by the acid before it ever hits the pan. Keep acidic marinades to 30 minutes–2 hours for boneless breasts, not overnight.

4. It might not be you at all – say hello to “woody breast.” This one surprises people. Modern fast-growing broiler chickens can develop a muscle condition called woody breast, where the fibers in the breast are abnormally stiff and hardened before it ever reaches your kitchen. It’s harmless to eat, but no amount of technique will fix meat that was already tough at the grocery store. Telltale signs are a noticeably firm, almost ridged fillet with pale, raised bands running through it. If you keep getting rubbery results despite doing everything right, it’s worth inspecting the raw breast next time – or switching to thighs, which are far more forgiving and rarely affected.

How to Avoid the Chew-Toy Outcome

  • Cook to temperature, not time – and stop the second you hit it. Carryover cooking will finish the job.
  • For poaching or boiling, keep the liquid at a gentle simmer, never a hard boil.
  • Limit acidic marinades to a couple of hours, tops.
  • Inspect raw breasts for firmness or visible striping before you cook them – sometimes the problem walked in the door with the chicken.
  • When in doubt, reach for thighs. They’re more resistant to both the dry-out problem and the rubber-band problem.

The Bottom Line

Dry chicken and rubbery chicken look like the same complaint from the dinner table, but they’re solved differently. Dry is about moisture leaving the meat. Rubbery is about the muscle fibers seizing up — sometimes from how you cooked it, and sometimes because the bird came that way. Nail the temperature, go easy on the acid, keep your simmer gentle, and you’ll knock out both problems for good.

Got a chicken mystery I haven’t covered yet? Let me know – Kitchen Forensics is far from closed.